Contouring, highlighting, strobing, we’ve done it all. The tiger-striped technique has polluted our Instagram for a long time. But now there’s a new kid on the block that has everyone gone crazy. All thanks to Kim Kardashian again. After making Contouring a thing she’s again started up a new makeup trend, Cook/Bake your makeup. This technique has infiltrated my Instagram and Pinterest pages already. But what exactly is Cooking/Baking? Am I supposed to set my Pots and Baking utensils and Cook my Makeup up? Well, don’t worry, you can step out of your kitchen for now.
Cooking doesn’t involve cooking makeup in your pots, but on your face. Sounds strange right? Cooking actually means letting your concealer and powder sit on your face for around 10 to 15 minutes. The body heat will melt the makeup into your skin. It’s like a chemical reaction. As the makeup oxidizes, it’ll change its texture and color. The demulcent ingredients will absorb into the skin and you’ll be left with a more pigmented texture to play with. The result is a smoother and pore-less finish that lasts way longer.
This technique is not really new. It has been implemented by the Drag community for a long long time. But like Fashion, everything comes back. And here we have yet another new makeup trend to experiment with.
So how do we do it?
Step 1: Eyecream
Apply an eye cream to avoid your concealer and cream caking up towards the middle of the day. Your eye area should be really moisturized to begin with. Apply your eye cream liberally. It’s never more. Trust me!
Step 2: Conceal
Apply your concealer. I personally use MAC Prolongwear Concealer. It’s the best concealer I could find till date. It’s really pigmented and gives me the coverage I want for my under-eye area.
Step 3: Blend
Blend your concealer. You can use the trendy Beauty Blender everyone’s been taking about but I use the good old makeup sponge. Works just fine for me. Make its damp though(absorbs way less product and gives a smoother finish)
Step 4: Translucent Powder
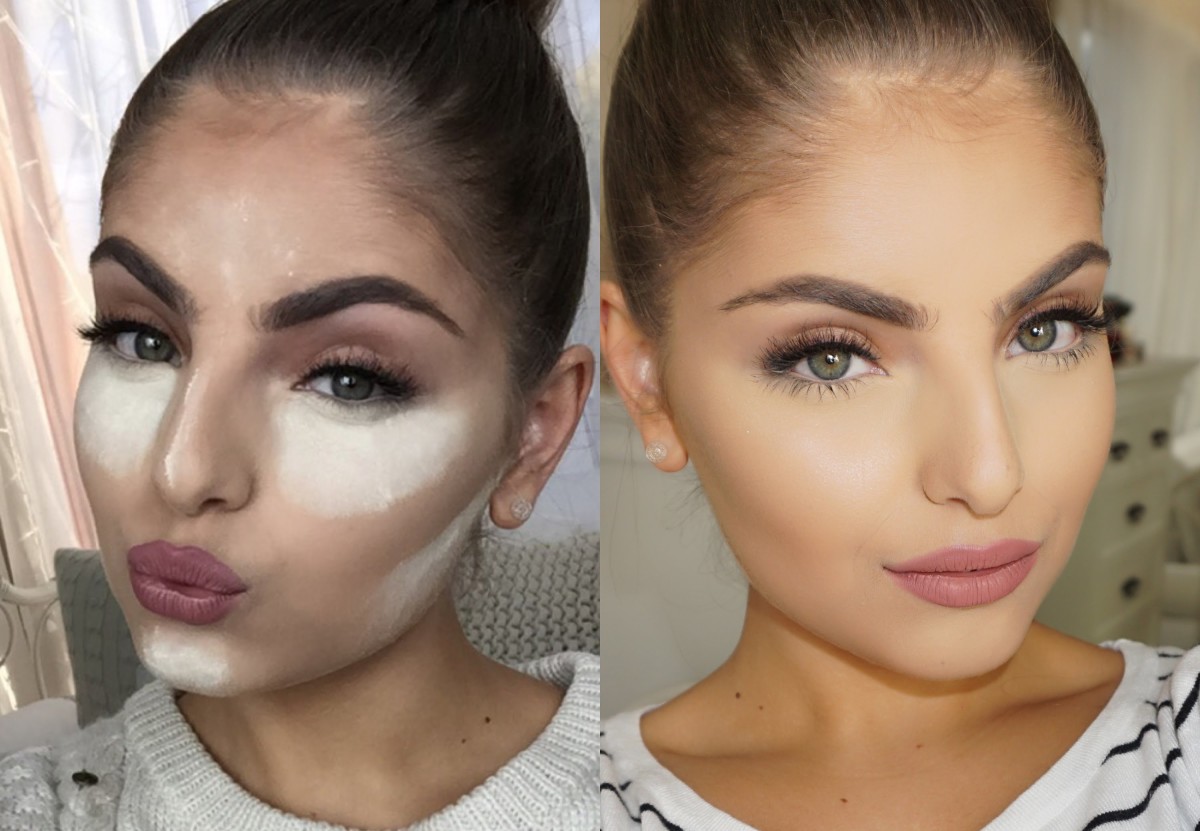
Dust a translucent powder under your eyes or wherever you want to highlight (your forehead, under your cheeks, your chin). You should be generous about this, you’re eventually gonna dust it off so no worries if you look like a ghost right now.
Step 5: Wait
Sit back and relax for 10 t0 15 mins. Let your body heat do the work for you. Let your makeup melt and blend into your skin. During this time you can do your eye makeup or set your hair.
Step 6: Dust it off!
Remove all the powder with a brush. Remember, it’s not buffing but brushing it off.
There you go, you have an illuminating, flawless face. Personally, I wouldn’t use this technique too often. It involves layering up a lot of product. For me, minimal foundation and concealer looks more youthful. Cooking/Baking technique gives you a full coverage base that wont budge so I would save this for events and special occasions like Weddings, Photo-shoots or an overnight party.
Still couldn’t get your head around it? Check out my favourite Makeup Artist Wayne Goss explaining it in the video below.